Showing posts with label photo setup. Show all posts

Thursday, April 3, 2014

New beginnings


This will eventually become No.73 in the Beachcombing series: Hulls Cove, March 6, 2014.

This is how the Beachcombing pieces start - sorting the debris from a day of beachcombing, looking for patterns, colors, likenesses. This one seems to be leaning toward warm greys and off-whites. 

And for another new beginning, I'm going to be moving this blog from the Blogger host over to Wordpress this month, and I'm not sure how that will affect the feed. Cross your fingers that it goes smoothly. I'm digitally literate but not fluent!

Friday, June 8, 2012

Review: Op/Tech Rainsleeve

Raindrops clinging to leaves and spiderwebs are so pretty ... but to photograph them, you have to take your camera out in the rain. I've always dealt with that by only using my (less expensive) Lumix in iffy weather, but after a year and a half with my first DSLR, the Nikon D7000, I finally got fed up with my point-and-shoot's limitations. That was my one big take-away lesson from shooting in Fiji - learn to use my 'good' camera in 'bad' weather.
Rainsleeve and Rainsleeve Flash
Op/Tech 18" SLR Rainsleeve

But I'm still a nervous nellie about breaking it, plus I've become very fond of Ginormica, and don't want her to get soaked. So I started reading up on rainsleeves. Some people swear by a plastic bag. Some people spend over a hundred dollars on a complicated and tailored rain coat for their rig. I read dozens of reviews, and finally opted for Op/Tech's bare bones rainsleeve.
It's basically a fitted plastic bag with a drawstring at one end to snug up around your lens (if you have a lens hood, you can pull the sleeve up to the edge of it.) There's a hole to fit around the camera eyepiece so you can see what you're shooting. The plastic is thicker than grocery bags and thinner than a painter's tarp; it feels reasonably sturdy. You could tear it if you tried, but not easily.
If it really pours, you can close the drawstring. Your hand does get sweaty inside the plastic, and yes, it can be awkward to maneuver inside the bag, but those are problems with even the high-end raingear, and this costs $6.50 for a two-pack.
Having this in my arsenal gave me the courage to bring the Nikon on the Ship Harbor field trip, where I happily played with raindrops.

Verdict: Cheap and serviceable.

All rainsleeve photos by Op/Tech USA

Thursday, June 7, 2012

Still Life Photos on the Go (Review of the Creative Light 20" Light Shed)

Waya Island, Kadavu; March 15, 2012 (Fiji Beachcombing series No.6)

My plans for vacationing in Fiji involved days of beachcombing and afternoons of photography. When I take the Beachcombing photos at home, I use a jury-rigged lightbox made of a three-foot-wide foamcore box filled with four construction lamps, topped with a sheet of Plexiglass, and lit from above with four more construction lamps. It's unwieldy even in the studio, and I couldn't image how to begin packing it. In addition, we had very strict weight limits for the flight from Viti Levu to Kadavu. Not only were our checked bags limited to 50 pounds, our carry-ons couldn't weigh over 15 pounds. My usual carry-on bag weighs 7 pounds empty. My camera with the big lens on it weighs just over 4 pounds. And I was traveling with three scuba divers and all their gear. Packing for Fiji was an exercise in 'do we really need that?" So when it came to a still life set-up, I had to find something that would weigh as little as possible.
Creative Light 100897 20 inch Light Shed

Enter the Creative Light 20" Light Shed, a simple wire-framed pop-up tent. Mine weighs exactly one pound, in its case. There are a lot of similar products out there, but I read through a lot of reviews and this one stood out as sturdy, reliable, and affordable (not cheap, though). The colored backdrops are junk, as many of the reviewers pointed out. They arrive creased, and this type of fabric never sheds its folds, so I tossed them as soon as they arrived. They weren't my style anyway. I cut a piece of foam core to fit the bottom. I like foam core because it reflects enough light to soften and brighten the interior, but not enough to cause glare or reflections. Of course it got bent in my luggage, but fortunately just a corner and I was able to work around it. I also brought a roll of white paper but didn't like working with it: it wasn't reflective and it got creased and dirty too easily. I'm still pondering other suitable materials.
I chose this particular size because I need a pretty large area to lay things out, and this was the smallest I thought could be useful. Any smaller and you're talking product photography, not my peculiar layouts. I'd have like something larger, but worried that it would be too heavy and bulky. Mine folds to 13" x 11" x 2"  - If it were round it would be about 12" diameter x 3" deep. Folding it is a challenge. If you've ever had one of those beach shelters that is supposed to twist up and get stuffed into a bag, you've run into this problem before. They like their freedom, they don't want to go in the bag, they fight being twisted, and they never fold as neatly as the factory did it. I found the video above on YouTube and watched it over and over and I twisted my damn light tent over and over until I finally got it folded up. It looks like this now:
 Lumpy, but contained. It fits nicely in a suitcase, which was the whole point. Oh - be careful when you open it. It springs open with some force. Boing! Right on my nose. You also need to straighten the wires a bit after it has been in storage (or squashed in your luggage) but it's easy to do. Bottom line reviewing this: hard to fold but totally worth it.

Before leaving, I tried hard to find a light source that was inexpensive, lightweight, packable, and bright enough, but failed utterly. I can tell the day is coming when I will have to invest in flashes, but I'll need at least two, and I have expensive taste. Plus they are bulky and awkward and ugly and I don't know how to use them well. Sigh. Although now that I think about it, I said something similar shortly before I bought my DSLR.

So what did I do for light? I used the sun. I really wanted artificial light because our trip was planned for rainy season. As it turned out, the skies only opened up on a still life session once. I brought the tent and my tripod out onto our bure's deck, tried to angle it so I would get maximum sunlight but no direct light into the tent, and took the best shots I could. Here's an image shot in RAW (shrunk for web display and watermarked, but otherwise straight out of the camera):
Keep in mind that RAW always has that flat look to it - it hasn't had any formulae applied to the data yet, which is the whole point of shooting in RAW. 
And here's what it looks like after brightening, color-balancing, and sharpening:


And there you have it: light tent + sunlight + tripod + Photoshop = portable still-life studio!

_______________________________________________________________________

The light tent link above leads to Amazon, where it is selling for $58. It's also available at B&H Photo for $58, and both sites offer free shipping. Disclosure: I get a slight commission if you follow the link and purchase from Amazon. I personally order from both companies: I tend to buy from Amazon when I have a random bunch of things that qualifies for free shipping, and from B&H (or my excellent not-quite-local camera store) when I'm getting some expensive technology.

Saturday, June 2, 2012

Review: Panasonic Lumix underwater camera (DMC-TS3)

Damselfish in a coral head off Two Trees Island, Kadavu, Fiji
Some of you were curious about the underwater camera I used for these shots.
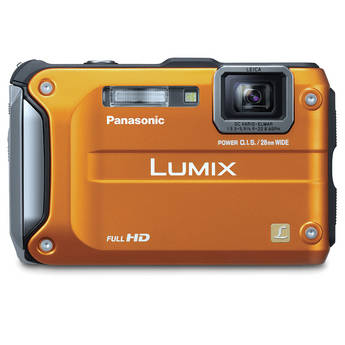
It was a Panasomic Lumix waterproof point-and-shoot. I bought mine from B&H Photo, but it is no longer available there. Amazon still carries it, though, starting at $326. (There's a more recent model out now, and although this review is limited to the one I used some of the pros and cons will remain the same.) 
Panasonic Lumix DMC-TS3 Digital Camera (Orange)
Panasonic Lumix DMC-TS3 Waterproof Digital Camera
The essential specifications are: 12MP, 28 mm wide-angle Leica lens, 4.6x zoom, and waterproof to 40 feet (some directions say 30 feet, but since I'm a snorkeler it doesn't matter. I'd have to tie a rock to my leg to get below 5 feet!) The manufacturer gives very specific direction on rinsing and cleaning the camera before opening it, and I was careful to follow them. Some people have reported leakage, but I was lucky and had no problem.

Negative

The lens is flush with the camera body, and hard against the top edge where you naturally hold the camera, so it's very easy to get a finger in front of it. Even after working with it for 2 weeks, knowing about this problem, I still had the occasional finger show up in my photos! There's also no cap or cover for the lens, so you can't just toss it in your bag or pocket. I'm thinking of modifying the body with some stuff I have called Sugru to make a lip around the lens so I can feel it.

The macro function is pretty good, although the depth of field is shallower than other point-and-shoots I've had, with lots of distortion just outside the focus point. It can be a cool look, but also a pain, especially when you are being tossed in a current and your mask keeps you from seeing exactly what's in your viewfinder.

I haven't played a lot with settings, keeping it mostly on iA, or no-flash. It tends to wash photos out a bit both underwater and on land - I've had to adjust every single one in postprocessing. Auto focus is unpredictable - I threw away a lot of blurred shots. I expected that with the underwater shots, but was surprised by the land ones. It has a lot of trouble with strong light contrast (like high noon) both in and out of the water. Lots and lots of blown-out highlights above and below water.

My usual carry-everywhere camera is another (not underwater)  Lumix, and I don't have any of these issues with it. In fact, it's an awesome little camera, which is one reason I bought this one.

Positive

It's waterproof, so no worries if you get caught in a tropical downpour, or slip on some rocks and sit down in a tidepool. It rained a lot while we were there, so I didn't carry my Nikon with me very often at all.

As for underwater photos, well, I knew it would be an experiment, and that I'd get better results with things that were closer to the surface, because of the available light. It still washed things out, just like it does on land, but no worse than most (non-pro) underwater photos I've seen. Here are examples of photos straight out of the camera and after color-balancing.


 Fogging
When it got very very hot, or perhaps when there was more temperature change than the camera cared for, the lens would fog up. The instruction manual says this is due to humidity (and yes, it was godawful hot and humid) and the remedy is to open the camera up and let it dry out. Since it always fogged up while I was out and about, I couldn't do that, but I found that if I turned it off and let it sit in my pocket, it would de-fog after half an hour or so. I lost a lot of photos to fogging. Here's what fogging looks like through the lens:
 
The first one is more thoroughly fogged than the second. After a while I started playing with the fog:
but it was still annoying.


My personal take-aways from the trip were:

 1. I need to stop treating my Nikon so delicately and start carrying it around more!

2. You need specialized equipment to get really good shots underwater. But it would cost me upwards of $3K to get a housing and lights for my Nikon so I bought this little guy instead. I suspect if I work with it more, choose my time-of-day more carefully, and get the hang of the funky macro, I could get some pretty good shots with it. Some snorkeling skills that would help are
-the ability to hover in a current
-the ability to hold the camera very still even when being sloshed by waves
-the ability to see through a snorkel mask well enough to read the LED display (half the time I was just pointing and guessing what was in the viewfinder!)
-and maybe farsightedness (I need to get a prescription mask for my nearsighted eyes!)

3. Fogging of the lens is unpredictable, inconvenient, and will make you lose photos opportunities in a humid environment.

4. Unless you are a diver, make sure you choose a site where the reef is less than 10' deep.  If you are a diver, you need big lights. The divers in the photo above are about 15 or 20' down, and you can see the difference - everything down there is blue.

5. This is tough, handy, versatile little camera. It has its faults and its limitations, but so do I.

Thursday, August 11, 2011

New Photo Technique

Aquamarine Sea Glass
I've been using a new photo technique I thought I'd share with you. I got the idea from this very useful (and short) video by Bryan Peterson, but I didn't want to run out and spend four or five hundred dollars on flashes and wireless. So, as usual, I cobbled together my own version.
 I built a box of foamcore, put 4 lamps in it with Ott Lite (daylight spectrum) bulbs, and topped it with a piece of white acrylic (the kind used for making signs).
I line up my subjects on the acrylic, and voila, no shadows, and lovely backlighting on the sea glass.
For your entertainment (as opposed to edification), here is the full setup. My flat files are in the center of the room, and I put my tripod on top so I could get farther away from the lightbox. I put a piece of plywood on top of the flat files so I don't dent them when I stand there. It isn't elegant, and my "studio" is packed to the gills and will never be featured in any magazine, but I get a LOT of exercise jumping up and down from this contraption!
Olive Green Sea Glass
 Pretty, ain't they?

Sunday, August 22, 2010

It's Here!


So the microphone boom wasn't nearly sturdy enough, even for my tiny little Olympus Stylus. With the camera mounted, the slightest touch made the boom wiggle. Aargh! So I gave up and ordered something designed for the job at hand. Sometimes you just can't DIY.
 I looked at tripod extensions first, since I have a perfectly serviceable, super sturdy, super cheap old (vintage!) Davidson Star tripod, and as you know by now I am a firm believer in using what you have. After reading a lot of reviews and online discussions, I settled on Giottos' MT9360 aluminum tripod with their MH1003 small ball head. I got mine from B&H Photo. (The second photo is from Adorama Camera.)
And I love it. The instructions could be clearer - it took me a good half hour to figure out how to switch the screw around to one that fit the ball head. Once I figured it out, it took less than 60 seconds to actually perform the switch. The tripod is lightweight, the locks move smoothly, changing the arm to a horizontal mount could not be easier. If I were in the mood to be picky, I could wish the arm were a leeetle longer, but I am so grateful to have something that works I am not disposed to find fault. Yes!

Next post: testing the new tripod....